Arduino (電腦)
與
Serial monitor(人機介面---電腦與人的翻譯者) 


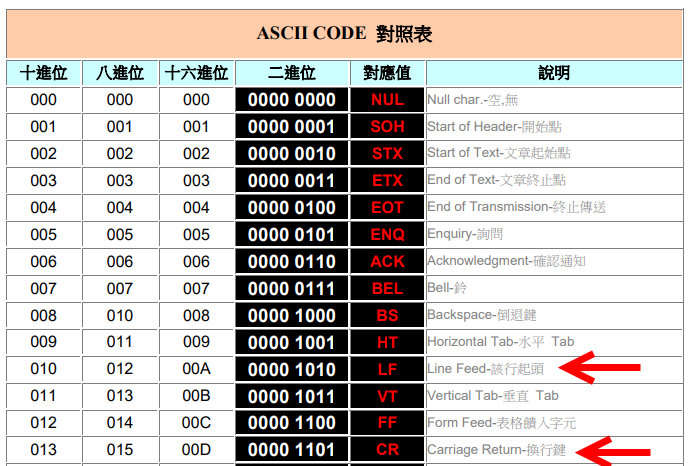
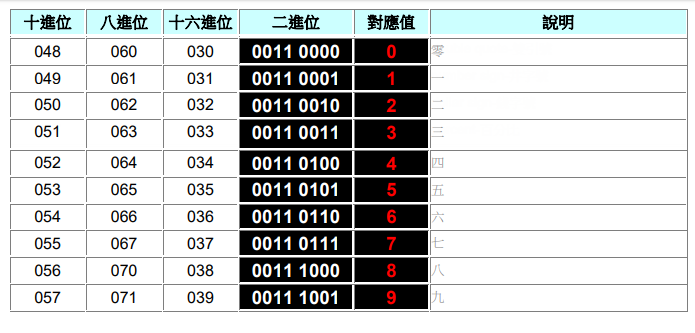
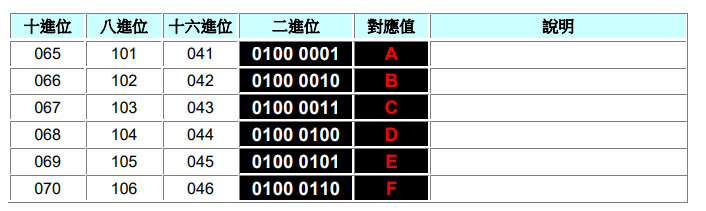
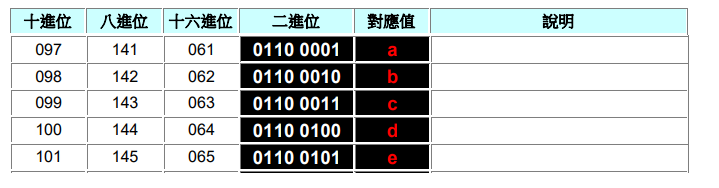
ASII Code Table(PDF) (含extended)
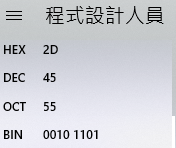
Converter

在文字處理中, CR, LF, CR/LF是不同作業系統上使用的換行符.
Windows採用回車 換行CR/LF表示下一行,
而UNIX/Linux採用換行符LF表示下一行,
蘋果機(MAC OS系統)則採用回車符CR表示下一行.

CR用符號'/r’表示, 十進位制ASCII程式碼是13, 十六進位制程式碼為0x0D;
LF使用'/n’符號表示, 十進位制ASCII程式碼是10, 十六進位制程式碼為0x0A.

所以Windows平臺上換行在文字檔案中是使用 0x0d 0x0a 兩個位元組表示,
而UNIX和蘋果平臺上換行則是使用0x0a或0x0d一個位元組表示.


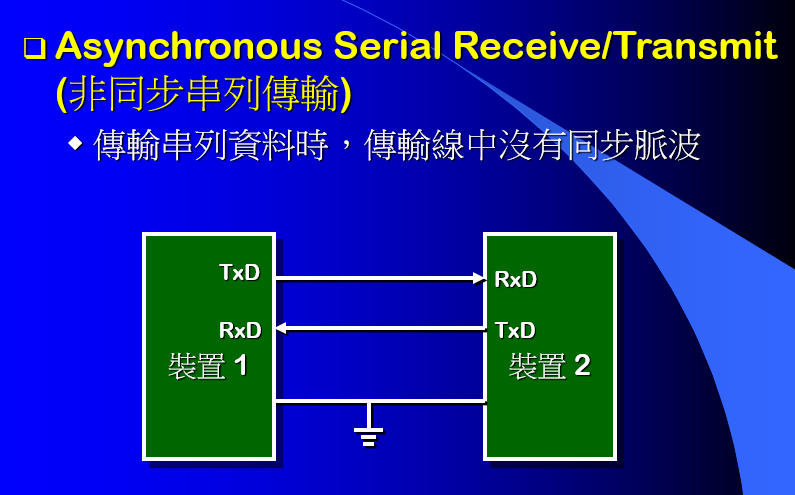
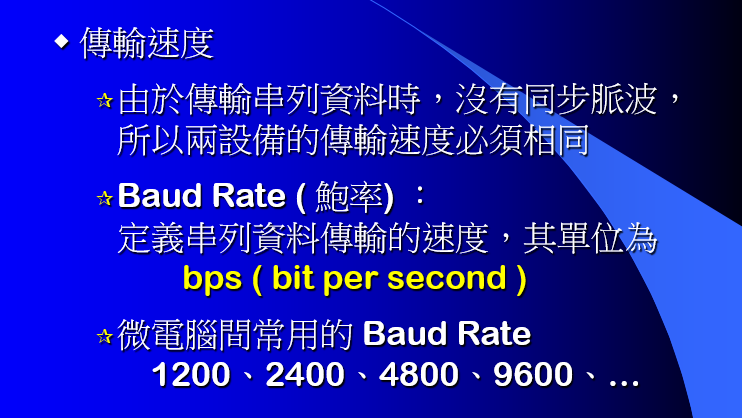
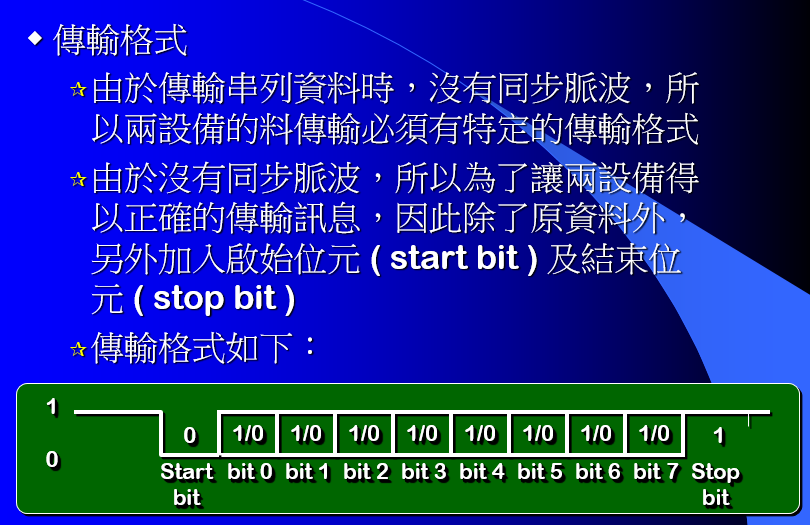
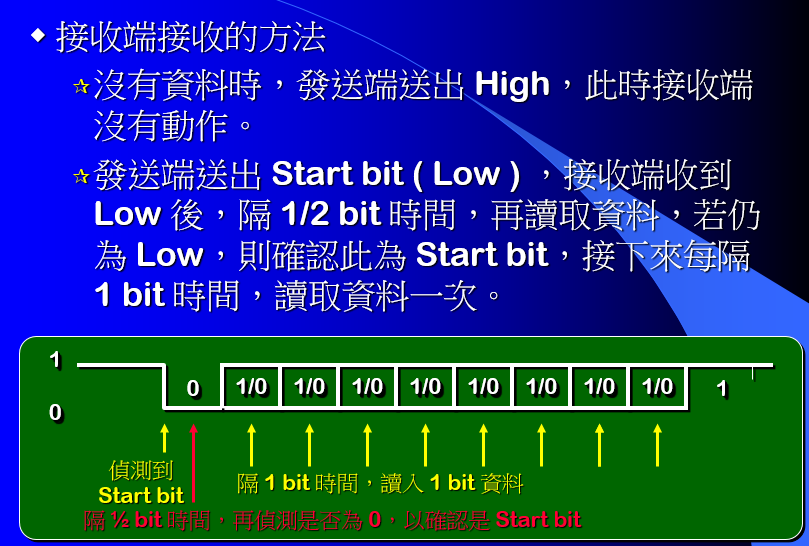
PROTOCOLS: UART - I2C - SPI - Serial communications #001(11:57)(YouTube)


void setup() {
  Serial.begin(1200);
  delay(1000);
}

void loop() {
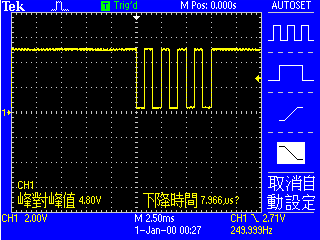
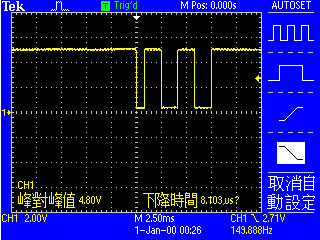
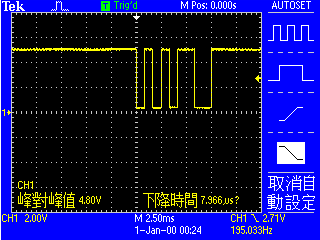
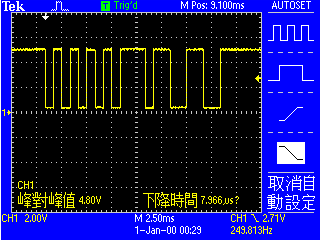
Serial.write(0b01010101);
//Serial.write(85);
 //Serial.write(0x55);
 //  Serial.write('U');

//Serial.write(0b00110011);
// Serial.write('3');

  delay(20);
}


'U'

下降緣觸發
 Autoset

'3'    00110011


'5'   00110101


'U'  delay(10)  '3'


Serial (Arduino.cc)


Serial.write()(Arduino.cc)
Syntax:
Serial.write(val)
Serial.write(str)
Serial.write(buf, len)

Parameters:
Serial: serial port object.
val: a value to send as a single byte. (0~255)
str: a string to send as a series of bytes.
buf: an array to send as a series of bytes.
len: the number of bytes to be sent from the array.

Returns
write() will return the number of bytes written, though reading that number is optional.
Data type: size_t. (無號整數,0~系統之整數最大值)

//Example Code
void setup() {
  Serial.begin(9600);
}

void loop() {
/* send a byte with the value 45*/
  Serial.write(45); //送出一個byte 0010 1101

/*send the string "hello" and return the length of the string.*/
  int bytesSent = Serial.write("hello");//送出5個byte
  //bytesSent=5
  //Serial.write(bytesSent); //送出binary 5-->0000 0101
  Serial.print(bytesSent); //送出5的ASCII Code-->0011 0101 
  delay(1000);
}


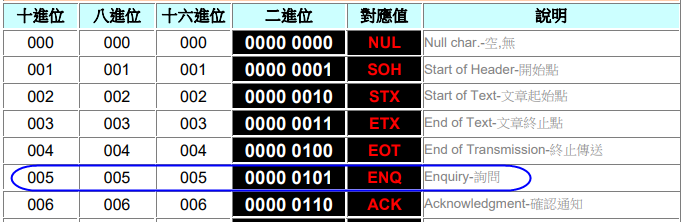
Serial.write(5) 送出 0000 0101  serial monitor 顯示不出來

ENQ 不可見之控制碼(要求接收後發出回應(ACK)來驗證該設備是否online)

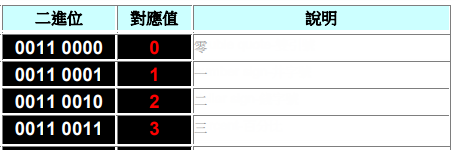
Serial.print(5) 送出 0011 0101  serial monitor顯示 5

Serial.write(5+48) 送出 0011 0101  serial monitor 顯示5


Serial.write() Writes binary data to the serial port.
This data is sent as a byte or series of bytes;
to send the characters representing the digits of a number use the Serial.print() function instead.

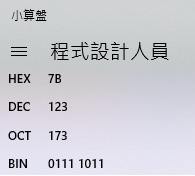
Serial.write(數)  : Serial.write(123)--->0111 1011


serial monitor 收到後印出 {


Serial.print(字)   : Serial.print(123)-->"1" ,"2" ,"3" 一共3個Byte
0011 0001  ,   0011 0010 , 0011 0011


Serial monitor :
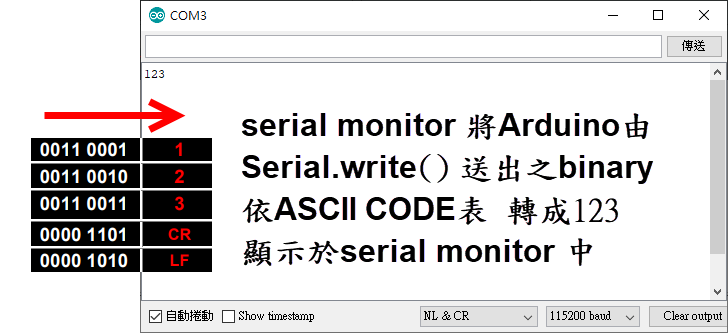
一律將收到的binary 轉為ASCII code顯示出來
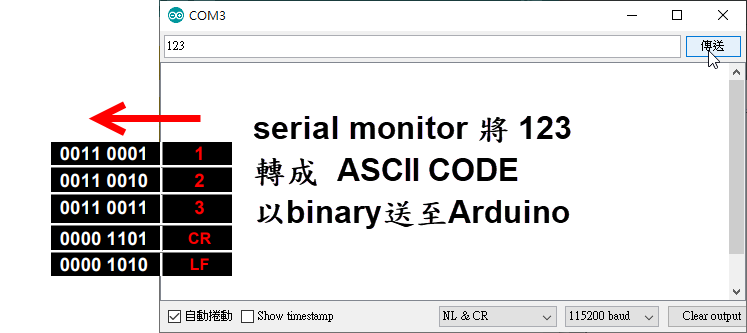
一律將欲傳送的資料一個一個的轉為binary傳送
為"人"與"電腦"的翻譯者


Serial.read()

Returns
The first byte of incoming serial data available (or -1 if no data is available). Data type: int.


#define led 12
void setup(){
Serial.begin(115200);
pinMode(led,OUTPUT);
digitalWrite(led,LOW);
}
void loop(){
if(Serial.available()){
    if(Serial.read()==49)
  digitalWrite(led,HIGH);
  else
  digitalWrite(led,LOW);
  delay(2000);
}
}


//試試 Serial.read()==1
//試試 Serial.read()=='1'


Arduino 1---Transmitter

void setup(){
Serial.begin(115200);
}
void loop(){
Serial.write(1);
delay(2000);
Serial.write(0);
delay(2000);

}


Arduino 2---Receiver

#define led 12
void setup(){
Serial.begin(115200);
pinMode(led,OUTPUT);
digitalWrite(led,LOW);
}
void loop(){
if(Serial.available()){
    if(Serial.read()==1)
  digitalWrite(led,HIGH);
  else
  digitalWrite(led,LOW);
  delay(2000);
}
}


收到什麼就送出什麼
int8_t  x;
void setup(){
Serial.begin(115200);
}
void loop(){
if(Serial.available()){
  x=Serial.read();
  Serial.write(x);
}
}

或

void setup(){
Serial.begin(115200);
}
void loop(){
if(Serial.available()){
  Serial.write(Serial.read());
}
}


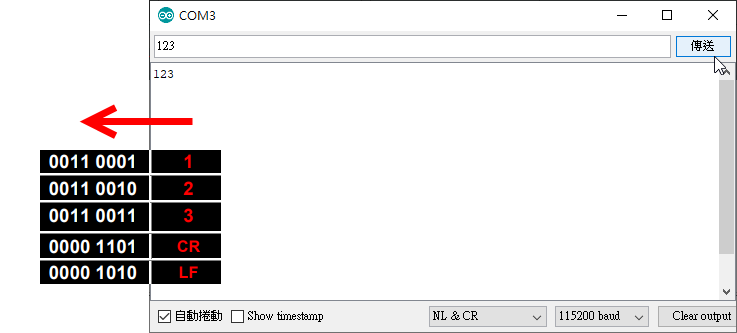
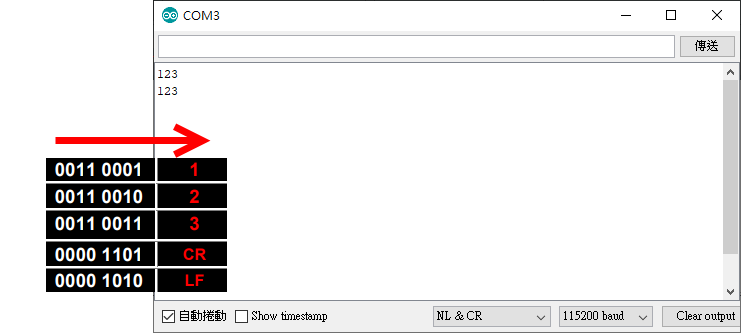
電腦只認識0,1二進位
Serial monitor 將二進位 轉換成"文字"顯示給"人"看。
123是"1", "2", "3"三個"文字"
ASCII Code 為二進位與"文字"之轉換表
Unicode(萬國碼) 亦為二進位與"文字"之轉換表


Serial.print() (Arduino.cc)

Prints data to the serial port as human-readable ASCII text. This command can take many forms.
Numbers are printed using an ASCII character for each digit.
Floats are similarly printed as ASCII digits, defaulting to two decimal places.
Bytes are sent as a single character.
Characters and strings are sent as is.
For example-
Serial.print(78) gives '7' '8'
Serial.print(1.23456) gives '1' '.' '2' '3'
Serial.print('N') gives  'N'
Serial.print("Hello world.") gives 'H' 'e' 'l' 'l' 'o' ' ' 'w' 'o' 'r' 'l' 'd' '.'

An optional second parameter specifies the base (format) to use; permitted values are BIN(binary, or base 2), OCT(octal, or base 8), DEC(decimal, or base 10), HEX(hexadecimal, or base 16).
For floating point numbers, this parameter specifies the number of decimal places to use.
For example-

Serial.print(78, BIN) gives "1001110"
Serial.print(78, OCT) gives "116"
Serial.print(78, DEC) gives "78"
Serial.print(78, HEX) gives "4E"
Serial.print(1.23456, 0) gives "1"
Serial.print(1.23456, 2) gives "1.23"
Serial.print(1.23456, 4) gives "1.2346"

Syntax
Serial.print(val)
Serial.print(val, format)

Parameters
val: the value to print. Allowed data types: any data type.

Returns
print() returns the number of bytes written, though reading that number is optional. Data type: size_t.

Example Code
void setup() {
  Serial.begin(115200);
}

void loop() {
  // print labels
  Serial.print("NO FORMAT");  // prints a label
  Serial.print("\t");         // prints a tab

  Serial.print("DEC");
  Serial.print("\t");

  Serial.print("HEX");
  Serial.print("\t");

  Serial.print("OCT");
  Serial.print("\t");

  Serial.print("BIN");
  Serial.println();        // carriage return and line feed after the last label

  for (int x = 0; x < 64; x++) { // only part of the ASCII chart, change to suit
    // print it out in many formats:
    Serial.print(x);       // print as an ASCII-encoded decimal - same as "DEC"
    Serial.print("\t\t");  // prints two tabs to accomodate the label lenght

    Serial.print(x, DEC);  // print as an ASCII-encoded decimal
    Serial.print("\t");    // prints a tab

    Serial.print(x, HEX);  // print as an ASCII-encoded hexadecimal
    Serial.print("\t");    // prints a tab

    Serial.print(x, OCT);  // print as an ASCII-encoded octal
    Serial.print("\t");    // prints a tab

    Serial.println(x, BIN);  // print as an ASCII-encoded binary
    // then adds the carriage return with "println"
    delay(200);            // delay 200 milliseconds
  }
  Serial.println();        // prints another carriage return
}


The commands Serial.print(217) or Serial.print("217") will both print the same thing: 00110010 00110001 00110111.
This is because the print command first converts any number to a string representation and then uses the command Serial.write() to send each character as individual ASCII bits.

Serial.print("217",HEX)------WRONG!
Serial.print(217,HEX) --------OK!
Serial.print(65535,HEX) --------OK!


Serial.println() (Arduino.cc)


void setup(){
Serial.begin(115200);
}

void loop(){
if(Serial.available()){
Serial.println(Serial.read());
}
}


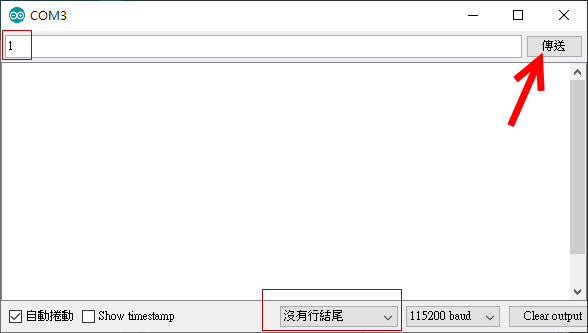
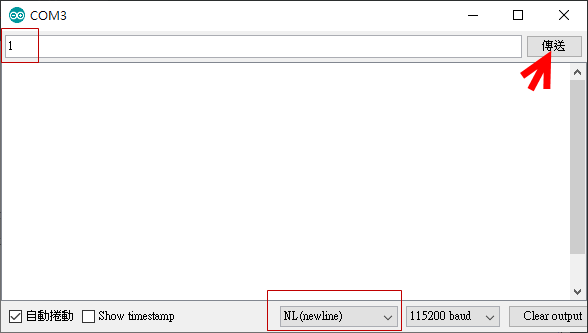
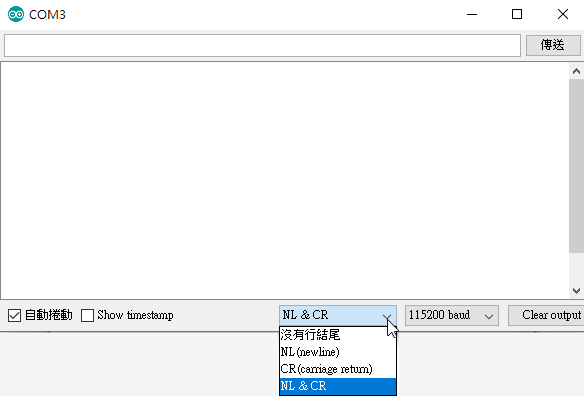
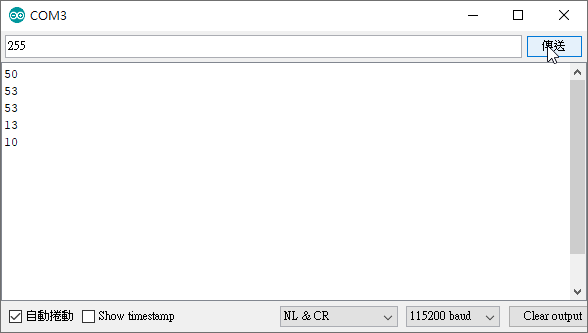
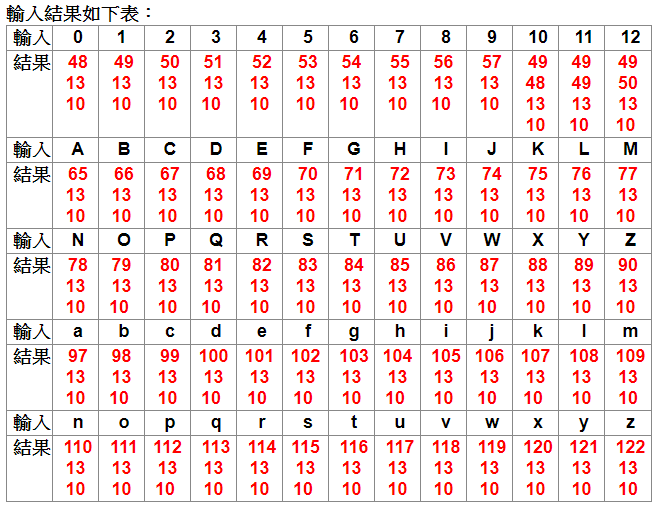
如果設定為:
(1) NL & CR 就會在送出的字元代碼之後加上 13 與 10
(2) 沒有行結尾 ==> 只送出字元代碼
(3) NL ==> 在字元代碼之後加上 10
(4) CR ==> 在字元代碼之後加上13


ASII Code Table(PDF)
Converter


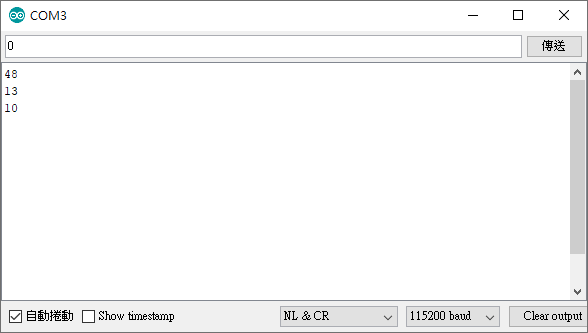
  1. 第二個代碼皆為13,第三個代碼皆為10
  2. 第一個代碼為傳送的字元代碼
  3. 第二個代碼13代表CR(游標歸位)
  4. 第三個代碼10代表NL(下一行)
  5. 兩位數 像10 就是依序傳出1(49)與0(48)再加上歸位(13)與下一行(10)
顯示16進位

void setup(){
Serial.begin(115200);
}

void loop(){
if(Serial.available()){
Serial.println(Serial.read(),HEX);
}
}


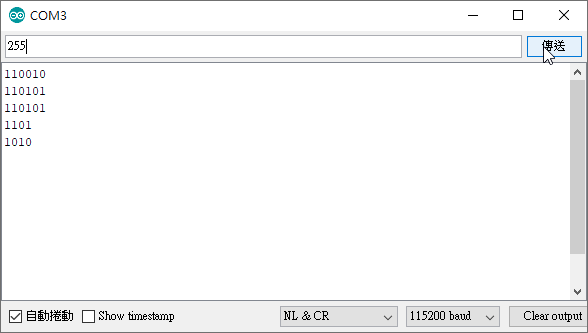
顯示二進位

void setup(){
Serial.begin(115200);
}

void loop(){
if(Serial.available()){
Serial.println(Serial.read(),BIN);
}
}


補充說明


Serial.read()


Returns
The first byte of incoming serial data available (or -1 if no data is available). Data type: int.

Serial.readBytes()

Serial.readBytes() reads characters from the serial port into a buffer. The function terminates if the determined length has been read, or it times out (see Serial.setTimeout()).

Serial.readBytes() returns the number of characters placed in the buffer.
A 0 means no valid data was found.

Syntax
Serial.readBytes(buffer, length)

Parameters
buffer: the buffer to store the bytes in. Allowed data types: or array of char or byte.
length: the number of bytes to read. Allowed data types: int.

Returns
The number of bytes placed in the buffer. Data type: size_t.

Example:
char readData[10];//The character array is used as buffer to read into.
int x = Serial.readBytes(readData,10);//10 is the length of data to read.


The function continuously read the received data from the buffer and if target number of character is received it will return with the number of character. And if the number of character it read is less than specified number and timeout time is completes than it will return the number of characters, which is less than the target length.

Serial.readBytesUntil()
Serial.readBytesUntil() reads characters from the serial buffer into an array. The function terminates (checks being done in this order) if the determined length has been read, if it times out (see Serial.setTimeout()), or if the terminator character is detected (in which case the function returns the characters up to the last character before the supplied terminator). The terminator itself is not returned in the buffer.

Syntax
Serial.readBytesUntil(character, buffer, length)

Parameters

character: the character to search for. Allowed data types: char.
buffer: the buffer to store the bytes in. Allowed data types: array of char or byte.
length: the number of bytes to read. Allowed data types: int.

Returns
Data type: size_t.

Example:
char readData[10];//The character array is used as buffer to read into.
int x = Serial.readBytesUntil(“\n”,readData,10);//10 is the length of data to read.

The function continuously read the received data and store in the variable provided.

The function can exit by three events-

1.The timeout time completes, by default the timeout time is one second.
2. Before the timeout time, the function received the specified number of characters ( 10 char ).
3.Before above two events, the function received terminating character ( “\n” newline character ).
In all the three exit case the Serial.readBytesUntil() function return the number of character read in the buffer variable.

The default wait time is one second, which can be modified with the help of function Serial.setTimeout().

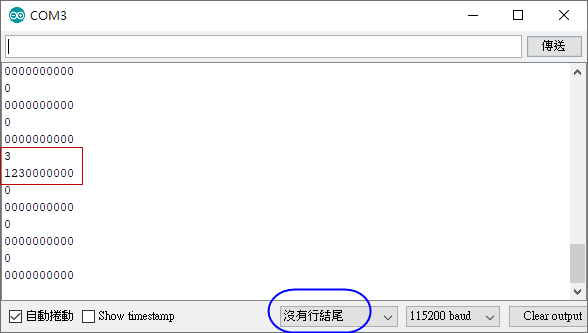
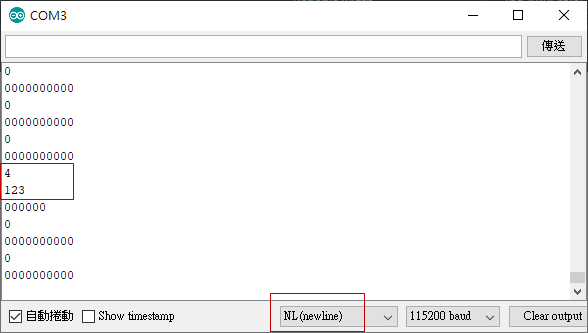
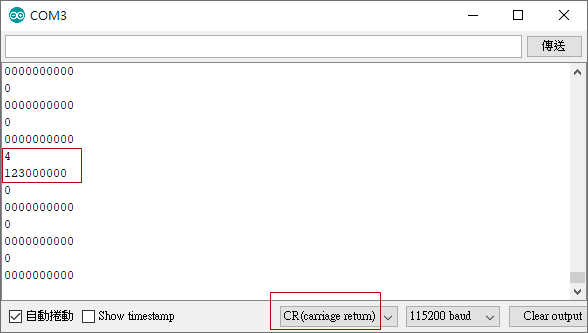
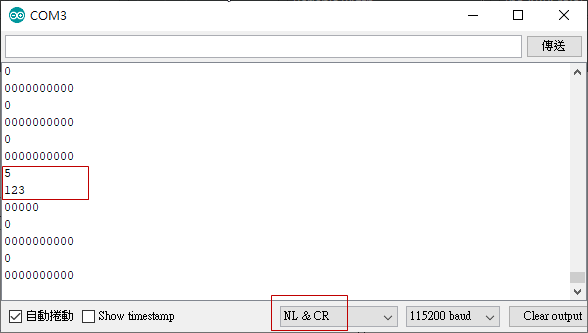
void setup()
{
    Serial.begin(115200);     
}
void loop()
{
/*The character array is used as buffer to read into.*/
    char readData[10]="0000000000";
/*It require two things, variable name to read into, number of bytes to read.*/
    int x = Serial.readBytesUntil("\n",readData,10);
/*display number of character received in readData variable.*/
    Serial.println(x);
/*send back the 10 bytes of data.*/
    Serial.println(readData);
    delay(500);
}  


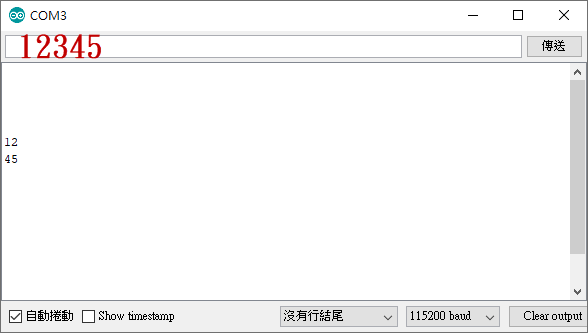
於Serial Monitor 傳送 123


Serial.readString()
Description
Serial.readString() reads characters from the serial buffer into a String. The function terminates if it times out (see setTimeout()).

Syntax
Serial.readString()

Parameters
Serial: serial port object. See the list of available serial ports for each board on the Serial main page.

Returns
A String read from the serial buffer

Example:
String a;
void setup() {
Serial.begin(115200);
}

void loop() {
while(Serial.available()) {
a= Serial.readString();
Serial.println(a);
}
}


Serial.readStringUntil()

Description
readStringUntil() reads characters from the serial buffer into a String. The function terminates if it times out (see setTimeout()).

Serial.readStringUntil() inherits from the Stream utility class.

Syntax
Serial.readStringUntil(terminator)

Parameters
Serial: serial port object. See the list of available serial ports for each board on the Serial main page.
terminator: the character to search for. Allowed data types: char.

Returns
The entire String read from the serial buffer, up to the terminator character

Notes and Warnings
The terminator character is discarded from the serial buffer.


void setup()
{
    Serial.begin(115200);
    
}
void loop()
{
    String readData;
    readData= Serial.readStringUntil('3');
    Serial.println(readData);
    delay(500);
}  

//傳送 12345


Serial.print()
於Serial Monitor中顯示不換行


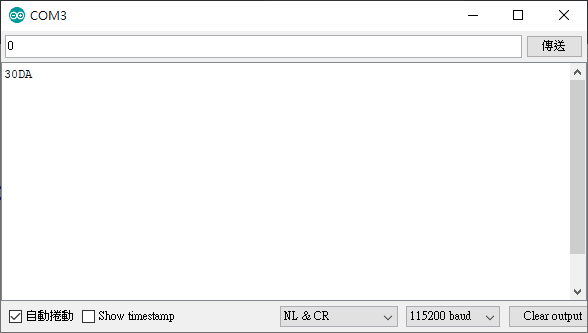
void setup(){
Serial.begin(115200);
}

void loop(){
if(Serial.available()){
Serial.print(Serial.read(),HEX);
}
}


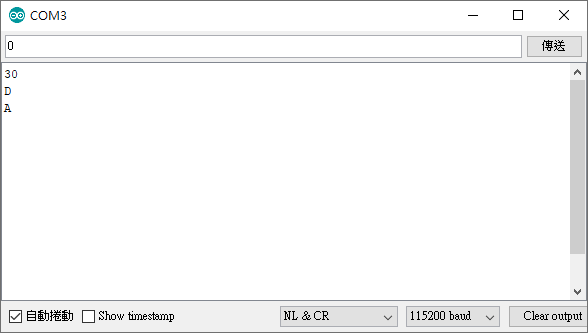
0--->30DA


Serial.write(0x45);   // will write 0100 0101 to the cable

Serial.print in the other hand is more versatile , it will do the conversion for you from ASCII to binary it also can convert to BIN/ HEX/OCT/DEC but you need to specify a second argument like so

Serial.print(76, BIN) gives "0100 1100"
Serial.print(76, OCT) gives "114"
Serial.print("L", DEC) gives "76"
Serial.print(76, HEX) gives "4C"


Serial.write(0x48);   // H
Serial.write(0x45);   // E
Serial.write(0x4C);   // L
Serial.write(0x4F);   // O


Serial.print("HELLO");


Serial.println("HELLO");

Serial.println()  will add  2 bytes 0x0D and 0x0A


The commands Serial.print(217) or Serial.print("217") will both print the same thing: 00110010 00110001 00110111. This is because the print command first converts any number to a string representation and then uses the command Serial.write() to send each character as individual ASCII bits.


Serial.write() 和Serial.print()的主要差異

例如:
Serial.print(65); // 輸出’6’和’5′     0x36,0x35

Serial.write(65);
// Serial monitor 解釋為 ’A’  ,
//若傳給另一Arduino 就是 0x41    0100 0001

Serial.print()與Serial.println() 有多種format 可用,適合顯示(與人溝通)
Serial.wrte()則無,適於晶片與晶片間通訊

Serial.write("123"); 相當於
Serial.print("123") ;
Serial.print(123) ;
相當於
Serial.write(0x31);
Serial.write(0x32);
Serial.write(0x33);


Serial.println("123") ;
相當於:
Serial.write(0x31);
Serial.write(0x32);
Serial.write(0x33);
Serial.write(0x0d);
Serial.write(0x0a);


人<----->晶片
Serial Monitor 與 Arduino 通訊
Serial monitor 以ASCII code傳送資料

使用Serial.read();讀取序列埠視窗傳來的數字時
1.會回傳ASC II碼
2.將一個數字一個數字讀取,必須使用字串的方式存取傳來的數字
3.翻譯ASC II碼,C語言內有幾個重要的函式可以負責。

先將傳來的數字儲存成字串,再將字串轉換為數字,可透過下表來轉換字串為數字

轉換字串函數 轉換數字 註解
atoi(字串,字數); -32768 ~ 32767 字串轉整數
atol(字串,字數); -2,147,483,648 到 2,147,483,647 字串轉長整數
atof(字串,字數); -3.4028235E+38 至 3.4028235E+38 字串轉浮點數(小數)


//攝氏轉華氏
byte cmd[9] ;
void setup(){
Serial.begin(9600);
Serial.setTimeout(10); // 設定為每10毫秒結束一次讀取(數字愈小愈快)
}

void loop(){
if(Serial.available()){
 Serial.readBytes(cmd,9);
 Serial.println(atof(cmd)*0.6+32);
}
}
cmd 有9個 byte
若於serial monitor 輸入25再傳送
傳了兩個byte 後每隔10ms沒資料進來,就timeout 一次
直到9次 完成讀取動作


第二種方法
void setup(){
Serial.begin(115200);
Serial.setTimeout(10); // 設定為每10毫秒結束一次讀取(數字愈小愈快)
}

void loop(){
if(Serial.available()){
 int x = Serial.parseInt();
 Serial.println(x);

}
}

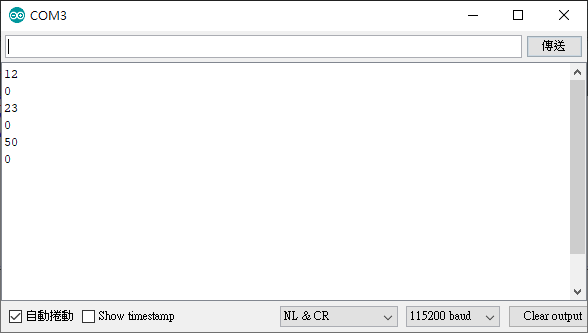
輸入12  23  50


發現每個輸入的數字下方都會有個0,作為輸入結束的代碼


int x,y;
void setup(){
Serial.begin(9600);
Serial.setTimeout(10); // 設定為每10毫秒結束一次讀取(數字愈小愈快)
}

void loop(){
while(Serial.available()){
  x = Serial.parseInt();
  y = Serial.parseInt();
 Serial.print(x);  // 這邊的x就是我們輸入的值
 Serial.print(" , ");
 Serial.println(y); //這邊的y就是回傳的中止碼0
}
}
攝氏轉華氏

float x;
int y;
void setup(){
Serial.begin(115200);
Serial.setTimeout(10); // 設定為每10毫秒結束一次讀取(數字愈小愈快)
}

void loop(){
while(Serial.available()){
  x = Serial.parseFloat();
  y = Serial.parseInt();
  Serial.println(x*0.6+32);  // 這邊的x就是我們輸入的值
}
}

由serial monitor 控制 Servo Motor
void setup(){
Serial.begin(115200);
Serial.setTimeout(10); // 設定為每10毫秒結束一次讀取(數字愈小愈快)
servo.attach(9);
}

void loop(){
while(Serial.available()){
  x = Serial.parseInt();
  y = Serial.parseInt();
  Serial.print(x);
 Serial.print(" , ");
 Serial.println(y);
 servo.write(x);
 delay(100);
}

 
}


Serial.setTimeout() (Arduino.ref)
sets the maximum milliseconds to wait for serial data.
It defaults to 1000 milliseconds.

Serial functions that use the timeout value set via Serial.setTimeout():

Serial.find()
Serial.findUntil()
Serial.parseInt()
Serial.parseFloat()
Serial.readBytes()
Serial.readBytesUntil()
Serial.readString()
Serial.readStringUntil()


byte byte_2[]={0x31,0x41};
void setup() {
 Serial.begin(9600);
   Serial.write(byte_2,sizeof(byte_2));
}

void loop() {
 

}
//Serial monitor 一律轉為ASCII Code 顯示


Serial.read()
return :
the first byte of incoming serial data available (or -1 if no data is available) - int


晶片<----->晶片
2 個 Arduino
使用Serial.write() 與Serial.read()傳送2 Byte data


傳送端

union uData
{
byte b[2];
int value;
};


union uData data;
void setup() {
Serial.begin(9600);
delay(1000);
}

void loop() {
data.value=0x3456;
Serial.write(0x21);//起始 字元
Serial.write(data.b[0]);
Serial.write(data.b[1]);
delay(1000);
}
或
union uData
{
byte b[2];
int value;
};

union uData data;
void setup() {
Serial.begin(9600);
delay(1000);
}

void loop() {
data.value=0x3456;
Serial.write(0x21);//起始 字元
Serial.write(data.b,2);
delay(1000);
}


接收端

#define Led  12
union uData
{
byte b[2];
int value;
};

union uData data;
 
void setup() {
 Serial.begin(9600);
pinMode(Led,OUTPUT);
digitalWrite(Led,1);
}

void loop() {
  if(Serial.available()>0)
{
  if(Serial.read()==0x21) //判斷是否為起始字元
  {
   //delay(10);//若資料傳遞不正確 可再加長
   // Wait until data is received  (不用delay)
   while ( !(UCSR0A & (1 << RXC0)) )  ;
   data.b[0]=Serial.read();
  
//delay(10);//若資料傳遞不正確 可再加長
  // Wait until data is received  (不 用delay) 
   while ( !(UCSR0A & (1 << RXC0)) )  ;
   data.b[1]=Serial.read();
   if(data.value==0x3456)
    { //Toggle D12
        digitalWrite(Led,1-digitalRead(Led));
      //asm("SBI 0x03,4");
    }
  }
 
  }
 }

或

#define Led  12
union uData
{
byte b[2];
int value;
};

union uData data;
 
void setup() {
 Serial.begin(9600);
pinMode(Led,OUTPUT);
digitalWrite(Led,1);
}

void loop() {
  if(Serial.available()>0)
{
  if(Serial.read()==0x21) //判斷是否為起始字元
  {
 // delay(10);//若資料傳遞不正確 可再加長
  Serial.readBytes(data.b,2);
   if(data.value==0x3456)
    {
     //Toggle D12
        digitalWrite(Led,1-digitalRead(Led));
      //asm("SBI 0x03,4");
    }
  }
 
  }
 }
或 使用interrupt
#define Led  12
union uData
{
byte b[2];
int value;
};

union uData data;

void serialEvent() {
   if(Serial.available()>0)
{
  if(Serial.read()==0x21) //判斷是否為起始字元
  {
   Serial.readBytes(data.b,2);
   if(data.value==0x3456)
    {
     //Toggle D12
        digitalWrite(Led,1-digitalRead(Led));
      //asm("SBI 0x03,4");
    }
  }
 
  }
}
 
void setup() {
 Serial.begin(9600);
pinMode(Led,OUTPUT);
digitalWrite(Led,1);
}

void loop() {
 
 }

或
#define Led  12
volatile int flag=0;
union uData
{
byte b[2];
int value;
};

union uData data;

void serialEvent() {
   if(Serial.available()>0)
{
  if(Serial.read()==0x21) //判斷是否為起始字元
  {
 
  Serial.readBytes(data.b,2);
   if(data.value==0x3456)
    {
      flag=1-flag;
    }
  }
 
  }
}
 
void setup() {
 Serial.begin(9600);
pinMode(Led,OUTPUT);
digitalWrite(Led,1);
}

void loop() {
          digitalWrite(Led,flag);
   }